Moto Guzzi California Motorcycles
Moto Guzzi California Motorcycle Owners News, Reviews and More
Change your Moto Guzzi California air filter
 The user’s manual says my Moto Guzzi California air filter should be checked every 3,000 miles (5,000 km) and changed every 6,000 miles (10,000 km). It also advises to “apply to a Moto Guzzi dealer”, or in other words, take it to your dealer to have the air filter changed.
So, I did change the air filter in my ’07 California Vintage myself. In this article, I show how I did it. It wasn’t all that difficult as you will see. Now I’m curious what it will be like to work on the future California 1400?
Here is the step-by-step procedure as I did it when I changed my air filter. This is not intended to be the perfect or best way, its just the way that I did it. Of course, a Moto Guzzi dealer is the preferred way to go. I am lucky because I have one near me, but like a lot of motorcycle owners, I prefer to perform some of the routine maintenance myself, like doing an oil change. It helps me know the bike better.
 Step 1: After riding in the “low-fuel” range to empty most of the tank, and after the bike is cold, remove the seat. Put the ignition key in the seat lock located on the left side of the bike near the 12 VDC power outlet. The key can not turn hardly at all, but you may hear it click as it releases the seat lock. Lift the seat from the rear and tilt it upward towards the handlebars and it should lift right off. If not, maybe the lock did not release it, so try the key again and be careful not to break the key trying to rotate it.
Step 2: Using a hex wrench, remove the single button head cap screw that fastens the rear of the fuel tank to the chassis. It is located between the tool tray and the tank and is right in front of you if you have the seat off.
 Step 3: Remove the covers that are on each side of the bike located just in front of the fuel tank. These were chrome on some California models, such as the EV, but are flat black on the California Vintage. I’ve often considered replacing mine with chrome ones, but am still on the fence about doing that. Each cover has two button head cap screws with large washers. You will need a smaller hex wrench for these. The screw located closest to the steering damper is hard to get to. I noticed that the newer Vintages have different steering damper and am not sure if the screw is still accessible without remove the damper those. You will need to turn the handlebar to fish out the cover on each side, but it is not hard to do.
 Step 4: Lift the fuel tank up so that the front can sit on the center pivot bolt at the steering head. The front of the tank easily pivots and is not held by screws. It sits in some sort of rubber piece on both sides that I could not really see very well. There is a rubber strip edge guard on the tank that protects it when you do this. Tilt the rear of the tank up while the front rests on the steering head bolt. You won’t be able to lift it really far without disconnecting fuel lines and other stuff under there, but the good news is that you can lift it far enough with one hand while using your other hand to put a hex wrench on the front center screw of the air filter box to remove that screw.
 Step 5: Remove all 3 screws that hold the air filter box cover on. Hopefully you already removed the front screw in step 4. Now you just need to remove the two rear screws. After the screws are out, and while you do your one-handed balancing act with the fuel tank, you should be able to lift and pull out the filter cover with the filter still inside it. It will take a little wiggling, but it came right out on mine. Once it is out, you can set the tank back down on the bike.
Step 6: So, here you are with the air box cover and filter. Remove the filter and take a good look at it. Mine had a few small bugs and some fine dust/dirt, but not much else. Overall, it was in good shape, but remember that a lot of dust and pollen is too small to see, so change it anyway as the miles dictate.  Before inserting the new filter, I wiped the entire air box cover clean, and then wiped inside of the lower air box as much as I could reach. I got some brownish-looking grease that had a little black dirt on it, but barely anything at all.
Step 7: Next, with the filter in the air box cover (it may want to fall out, so hold it carefully to keep it in place), put the air box cover with filter back under the fuel tank and onto the air box. This was more difficult than I thought it would be. It took me a few tries, but I finally got it. I was careful that the inlet “horns” on the air box were placed under the tank in such a way that the hoses and cables were not tangled or pinched.  That is not easy to do, but I mention it so that you if you try this, you will take care not to pinch anything under there either.
Step 8: Tighten down all three screws that hold the air box cover on. Make sure it closes properly when tightening those. Mine took a couple tries because I kept seeing the blue rubber portion of the filter on the left side of the bike, indicating that the cover and filter were not on correctly.
 Step 9: Position the fuel tank back to where it belongs and align the screw hole at the rear of the tank. Insert the screw with washer and tighten it down with a hex wrench.
Step 10: Re-install the left and right side covers that go in front of the fuel tank. The one on the left side takes a little more fussing because of the steering damper. Just be careful not to lose the steel bushings that go in the screw holes on these side covers. I dropped a few, but found them and got them back in their rubberized holes with ease before I inserted the two screws on each cover and tightened them down. After re-installing the seat, you are all done.
So, that was how I changed my air filter on my Moto Guzzi California Vintage. I hope this helps you next time you need to change yours, and if nothing else, I hope seeing this helps you make your decision whether or not to try to do this yourself next time on your Cali.
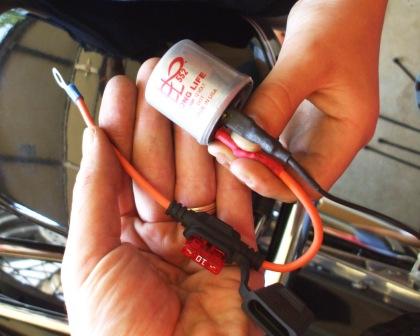
 One small regret I have is that I wish I had bought a K+N air filter instead of another UFI filter. Not that anything is wrong with the UFI filter, in fact, it’s the original equipment filter that Guzzi uses.
I’d like the K+N better because it would last me a lifetime of riding and is a more high-performance filter. The correct K+N air filter part number for a Moto Guzzi California is CG-9002 (for model years 1995 an up). It costs around $50 normally ships within 24 hours at BikeBandit. Their database doesn’t list all California model years, but search for part number CG-9002 as that crosses-over to Moto Guzzi part number 30113600 (UFI part number 3098900).
To clarify, I’m not saying that something is wrong if you would rather have the the dealer to do it for you. My point is that something is wrong if changing an air filter is so complicated that a dealer must do it.
Changing the Guzzi California’s air filter was a little more difficult than some folks might be used to. I suppose anyone could pinch a fuel line, or accidentally disconnect something under the tank, or mess up the routing of the cables and hose if they are not careful about things when re-assembling the airbox cover. I’m a mechanical engineer, but am NOT a professional motorcycle technician. Seriously, bring your bike to a Moto Guzzi dealer if in doubt.
Categorized Under
About John Clay
Suggested Articles
-
Four way flashers installed on Moto Guzzi
Four way flashers, also called hazard lights, are not standard on all motorcycles. Many motorcycles do not come equipped with them. My 2007 Moto Guzzi California Vintage did not have four way flashers until now.
-
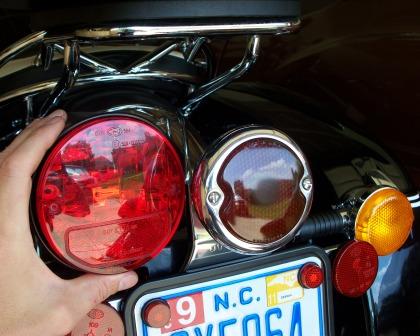
California Vintage tail light change
Moto Guzzi California Vintage 2006 thru 2008 model years seem to share a common failure issue regarding the tail light bracket. It cracks near the two holes that are closest…
-

Moto Guzzi California Rear Wheel Removal
Because of a flat rear tire on my 2007 Moto Guzzi California Vintage, I decided to remove the rear wheel by myself. I had never tried to do this before, but found it relatively easy to do. Luckily, I discovered the flat tire while at home. I would not want to do this on the side of the road, and I admire anyone that has done so.

Hello, and thanks for making all this very helpful info available. I own a 2001 MG California Special (some call it Bassa ?!) with the original orange color (hence I call my Cali the “school bus”) lol!
I just managed yesterday to install the air filter by myself, the tank was about 1/2 full so at some point I needed my son’s help to hold the tank from tipping sideways, as I supported it at 45 degrees with a dowel wedged in the seat mechanism while the other (sharpened) edge was in the hole where the hex screws goes that holds the tank down.
All went fine (started the bike and it runs fine) but I have two questions and will not take the bike out for a long drive unless I confirm the following:
First, the old filter was a UFI and I bought the new filter from MG Cycles. They looked identical BUT the new filter was a pita to install. It kept sliding back and out of position as I was placing the upper part of the air filter over it and when I finally managed to do that the back bolts installed fine but the front one no matter how snug it left a small (about 1/8″) gap between upper and lower air filter housings, I could see the blue air filter gasket. I wiggled the cover and pressed in place, as best as I could without breaking anything, perhaps I narrowed the gap down to 1/16″ or maybe 3/32″ but it did not want to close all the way down. So I decided to …tape the gap all round the left, front and right side of the air filter assembly with …aluminum air duct tape. It doesn’t look that bad, but I am wonder why the gap?!
Second, I was working fast (not a good habit) and I am not sure of this: On the front of the tank, slightly to the right side there is an aluminum part that screws on the underside of the fuel tank. It has a thicker hose going to it from the bottom left side (which I did not remove during the air filter change) but it also has a nipple protruding to the upper front right with a much smaller diameter. Well, I do not remember removing a hose from that smaller nipple, and during reassembly I could not see any loose hose …waiting to be connected somewhere.
All the other connections (e.g. main fuel line, fuel supply “petcock” and low fuel gauge electrical plugs, the tank overflow hose, and a breather(?) hose vertical under the middle of tank) all were accounted for and back where each belongs.
Like I said bike starts, revs up, and idles fine but I am skeptical taking it out on a long ride unless I confirm that that small nipple coming from that aluminum part is NOT connected to anything?!
Thank you for your help!
Hi,
what might have happened is: the K&N permit more air through, and this doesn’t fit the map used by the injection system, causing the bike to run too lean. this might even out, if the “learn blocks” in the calibration permit enough deviation from the factory settings for the fuel injection to recalibrate itself using the oxygen sensor, if youve got one. thats why Harley says “injection need recalibrating”.
had a similar effect when doing this to an old MG, needed resetting the carbs. old times, then…
cheers
Wolfram
poor running after the initial install of a K&N air filter is not uncommon, especially if you over oil the unit. Take the bike out for a good flog to get the excess oil sucked out of the filter and burned up thru the motor, and your bike will be back to running fine. There are other reasons why I don’t like to use K&Ns, like the holes they develop over time that let unfiltered air through, but that is another story.
Hi John,
Thanks for all the great tips and insights.
Today I am on the Washingston State Olympic peninsula to do a 500 mile loop. Prior to this run I wanted to change the CalVin air filter.
I bought a K&N for a premium price and installed it two days ago. The bike immediately had trouble idling and stumbled terribly at 2K RPM.
So I assumed improper install, tore it down and reinstalled.
Same problem.
So I did it again. I am persistent.
Still bad.
Then I assumed it was a bad tank of gas after the filter change as I had dried it up prior to the install.
So I siphoned the tank and refilled. No good.
So I pulled the plugs to see if they were the culprit.
Perfect. But for 5 bucks I went ahead and replaced them.
No resolution..
So I fished the old filter out of the recycle bin and reinstalled it.
IMMEDIATELY all problems solved. Runs like a sewing machine.
I am convinced by this experience that the K&N, which uses an oil coating on the cotton fiber filter, actually restricts airflow compared to the UFI. Not a good thing!! Guess we should all stock up on UFIs
At around 9,000 miles my fuel line came off of the fuel pump on a road trip. Luckily for me I was able to contact Ace in St. Joe Missouri. He knew exactly what had happened(I didn’t) and drove 200+ miles to get me. At his shop we took the gas tank off and since we had the airbox exposed Ace suggested “tricking it out” with a KNN. He sawed off the snorkels and used a hole saw to let in more air to the box with 3 or 4 strategically placed holes. He also rerouted the fuel filter for easier access and replaced the “melted- by-gasohol” fuel line with submersible fuel hose. I immediately noticed improved mid-range with a nice induction sound (kind of like a 4-barrel kicking in) when I opened up the throttle. I have since replaced the catalytic converter (we can still do these things in Wyoming) with a Euro-spec cross-over I got from Ace and that beautiful Guzzi sound and mid-range got even sweeter (without being much louder) and no reprogramming was necessary. Call Ace Cycle in St Joseph Mo. He’ll hook you up.
You do not have to take the tank off to accomplish this, I just installed a K&N on my Cal Vin, Don’t disparage if the cover just doesn’t fall into place as the gasket on the K&N is slightly thicker but will compress when all the bolts are in place. Thanks for the write up, It gave me the inspiration to do this after having the filter for the past month or so.