Moto Guzzi California Motorcycles
Moto Guzzi California Motorcycle Owners News, Reviews and More
California Vintage tail light change
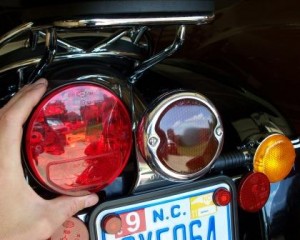 Moto Guzzi California Vintage 2006 thru 2008 model years seem to share a common failure issue regarding the tail light bracket. It cracks near the two holes that are closest to the sharp bend that supports the light.
When this unfortunately happened to me, my tail light housing was dangling from the cable harness without my knowledge as I rode to work.
Rather than replace the bracket with a new one, I decided to try to replace the tail light (sometimes referred to as the “coffee can”) with a reproduction 1933-1936 Ford tail light.
I had seen a California Vintage that had a Duolamp light from a Ford Model A and thought it looked great. I ended up choosing the ’33-’36 version instead because I liked the simpler style. For ’33-’36 Ford, the left housing has a window to light the license plate. The housing is polished stainless steel, just like the fenders on the Vintage.
Next step was deciding on how to mount it. It is much shorter than the original Guzzi light, so even if the original bracket didn’t fail, I would need to mount this new light closer to the license plate somehow. For this, I ended up purchasing a polished stainless license plate bracket made to mount the Duolamp tail light to a car, such as a street rod. I also got a curved stainless cover made for the Duolamp for the wires that come out the back of the lamp housing. Alternatively, there are Duolamp tail light kits available for motorcycles too.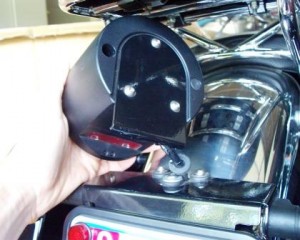
The new light, the mounting bracket, and the wire cover, all stainless steel, amounted to a little under $60 total cost.
The reproduction tail light for the Ford actually has a real glass lens and cork gaskets. The quality is quite impressive for the price. Even though I am interested in old cars, I hadn’t realized that these tail light parts are being mass-reproduced and are so easy to find, including replacement lenses.
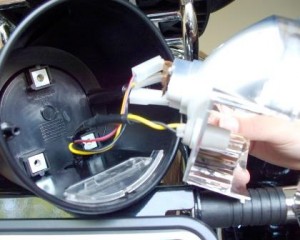 I got the standard type for an 1157 dual-filament bulb. The 12V bulb it came with is 30/30 Watts. I replaced it with my original Guzzi bulb rated 5/21 Watts to avoid any trouble. After riding with the new light, I now realize that 5 Watts is not visible enough, so will be changing it to something a little brighter. LED Duolamp tail lights are available too, but cost is almost double.
Some time ago, I had to change auxiliary lights to 35 Watts from 55 Watts due to battery drain issues from the bike’s minimalistic charging system. Since then, I am a little more aware to be cautious about the Watt ratings of all bulbs on my Guzzi.
The mounting bracket I used is intended for a car, so it is wider than necessary, but has long slots for license plate mounting. Instead of cutting it narrower, I left it as-is and attached my new Moto Guzzi logo license plate fasteners. Reflectors would be good there too, as I show in the photos using the two that normally face to the left and right sides from the stock bracket behind the license plate.
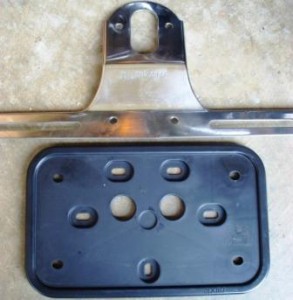 There are many ways I could have mounted the new light, but since I chose the Duolamp bracket instead of making one myself, I had to figure out how to attach it to the bike. I modified a pair of 1/4″ ID x 1/4″ long nylon spacers that would position the bracket and tail light at approximately the proper angle, otherwise the tail light would be pointing upward too far,
To modify the nylon spacers, I simply cut them at about the angle I needed, then sanded them to match each other. I drilled two 1/4″ holes in the new license plate bracket and in the black bracket on the Moto Guzzi. I then fastened these using two 1/4″-20 stainless steel screws with nylon insert locknuts. I used the original black plastic license plate holder (the one that says Aprilia on it) as a template to mark the hole locations.
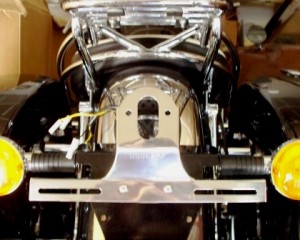 Reproduction Duolamp tail lights for Fords have 2 wires, yellow and white. Each are each covered with a cloth sleeve, and there is a single black protective sleeve that then covers both. The Moto Guzzi California Vintage has 5 wires going to the tail light. The dual-filament bulb has a yellow wire (tail light), a red-blue wire (brake light), and black wire (ground). There is also a yellow wire and a black wire that go to a small 5 Watt bulb that illuminates the license plate. I removed the small bulb since the repro Ford light (left side) does not need it due to the clear window it has for that.
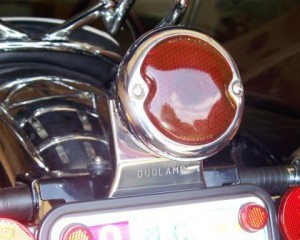 I connected the red-blue Guzzi wire (brake light) to the yellow wire of the new light. Pull back the cloth covers on the new light after you cut those wires to length so that you can see the colors. I connected the yellow Guzzi wire (tail light) to the white wire of the new light. I installed a ring terminal on black Guzzi wire (ground) and fastened it using one of the two screws that fasten the new light onto the Duolamp bracket. All connections were soldered.
Be careful to make sure you have the ground wire connected. It’s probably a good idea to have a spare 20 amp fuse handy for the lights in case something goes haywire (don’t ask me how I know this).
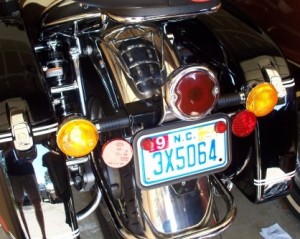 Because the Guzzi California EV, Jackal, California Aluminum, California Vintage a few other models have a similar rear fender design that includes a welded mounting feature (like a shelf, for the tail light assembly to attach to), I thought maybe I would replace the California Vintage “coffee can” tail light housing over to one of those twin tail lights from a Jackal, EV or other earlier California.
When I located one of those twin tail light housings, I was sad to see the base mounting feature (black part) is made from very thin plastic. I thought it would be sheet metal. The one I found had a few large cracks in the base, and the molded-in thread insert for one of the turn signals had pulled out. I was then informed that these have a history of failure issues, so that put an end to that idea.
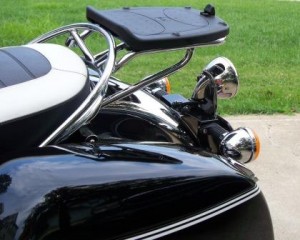 To see if anyone else had swapped out their stock California Vintage tail light over to something else, I posted the question on the forum over at WildGuzzi. Mike there suggested a reproduction Model “A” Ford tail light. I’m glad he did – thanks!
As a disclaimer, the purpose of this article is to share info with fellow Moto Guzzi enthusiasts, not to recommend that anyone make modifications to the safety equipment on their motorcycle.


Thank you for this write up. I just purchased my 2007 Cal Vin here in the Philly area. The previous owner has the same setup but the job wasn’t done as cleanly. I’m going to follow your advise. Your bracket setup looks great.
Need to change rear light bulb on my 1998 cali. Sealed unit, any ideas please ?
Here is my Moto Guzzi California Vintage “Taillight Pimp” 😉
https://www.youtube.com/watch?v=Q4hr6oUktYI
I found the bracket at MacsAutoParts.com in Lockport, NY. They sell parts for vintage cars and hot rods. I looked again for it there, but this time I could not seem to find the exact same one on their site. It is for Duolamp tail lights and is stamped Duolamp.
Great write up! where did you order your parts from? i can’t seem to find the license plate bracket.
Thanks!
Mine is a white ’09 Stefano, and it mounted up very nicely. Please see the Wild Guzzi link I put under John’s long term review article. IMO this taillight mod is a very worthwhile addition to the Cal Vin.
Stefano, thanks! Congratulations on your ’09 Cal Vintage. Your light bracket should have gussets near the 90 deg bend so should be better than mine was. The stock Cal Vin tail light hsg is 4 inches deep front to rear. My new light is 2-1/2 inches deep, and if mounted directly to the stock bracket, it would be too far behind the license plate to light it unless spaced forward. That spacer would need to adapt the 3 holes on stock bracket to 2 holes if using the same type light that I used.
John
Looks better than stock. I just acquired a 2009 vintage. I believe the issue has been corrected on my year model, but I wonder if this would bolt on the existing bracket.
thx
Stefano
PS: keep on blogging. Love your How to’s and articles.