Moto Guzzi California Motorcycles
Moto Guzzi California Motorcycle Owners News, Reviews and More
Installing Flashing Brake Lights On Guzzi
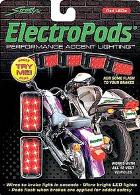
 I considered a few different types of additional flashing brake lights for my Moto Guzzi California motorcycle. The Streetfx ElectroPods flashing red brake light pods are what I decided to try first.
I had actually been planning on this little modification for a while. A car stopping quickly right at the last minute behind me convinced me that I waited too long. Luckily I was safe and still had the opportunity to get the brake flashers installed.
ElectroPods flashing brake lights come as a pair. They are available with either black or chrome housings. I chose the chrome housings because they blend in nicely with my polished stainless steel license plate holder. This is right where I had planned to mount them. Below, I explain and show you how I did this easy installation.
First, there is certainly a large variety of sizes, prices and quality available for flashing LED motorcycle brake lights. I really like the Custom Dynamics Light Bars too. They cost the same as the ElectroPods, about $30. They have a narrow red lens about 4.7 inches long, with 12 LEDs that flash for 5 or 6 seconds then stay on steady when brake is held on. The only reason I did not buy the Custom Dynamics light is because I had my mind set on filling the two small spaces on the ends of the Duolamp license plate holder that I installed a while ago.
The low $30 price, the small rectangular size, and the reasonable brightness of the ElectroPods flashing red LEDs is what influenced my purchase. I’d like some comments left at the bottom of this article from riders that have tried other brands and which ones they like to use. I think we’re all curious whether they would buy the same ones again or not.
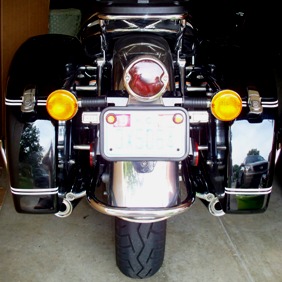
You may have read about the broken tail light bracket experience I had on my 2007 California Vintage. If you have a pre-2009 model Cal Vin, you will probably will experience the same bracket failure if yours does not have the gusseted bracket. I’d be surprised if it has not happened to you by now. Rather than repair the stock “coffee can” tail light and lens that got damaged when the stock bracket failed, I installed a 1930’s Ford style Duolamp tail light rather than fix the stock unit.
The “Ford” tail light still works fine and I continue to be very pleased with how that project turned out. However, the new lamp still has just one bulb. Just like the factory lamp did. If the brake light filament were to burn out, I don’t think I would ever realize it until my next pre-ride check, and that is only if I were thorough enough to catch it. We all should remember to check our brake lights before we put it in gear. Looks like the new Moto Guzzi California 1400 will have dual stylized tail lights.
 Adding the LED brake light pods gave my Moto Guzzi a redundant brake lighting system for just $30. Are there other ways to do this? Are there bigger and more obvious flashing brake lights on the market? Of course. My goal was simply a balance of additional safety without ruining the appearance of the California Vintage, and without spending money that I don’t have. Low cost is a common theme in my how-to articles in case you have not noticed. Hopefully this keeps with the spirit of many of us Moto Guzzi riders that try to be responsible with our spending.
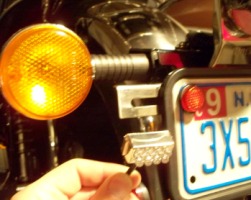
Because these LEDs are clear when they are off, they blend into their chromed plastic housings very well. You can also get these with a black housing. The size of the ElectroPods happens to be just the right size to fill in the extra length that is on both sides of my polished stainless steel Duolamp license plate holder. I had considered cutting the extra amount off the license plate holder so it would not protrude (designed for a car license plate), but now I am glad that I did not.
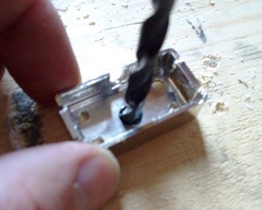
The ElectroPods flashing brake lights come with a high bond double-sided tape for mounting. No screws are included, but you can use screws to mount it, as I did. The rectangular light pod housing consists of two pieces. It has a front housing that has the LEDs potted inside it and a cable extending from it. There is a rear housing that snaps on very firmly from behind and that is what mounts to the bike.
 First, I unsnapped the rear housing on each other the two pods and drilled a hole through the center. I then fastened it to my license plate holder using one stainless steel button-head screw and a locknut for each pod. The lights are potted well inside their housing so they are protected from moisture. Only a black jacketed cable extends from each housing. Button head screws have a low head and don’t interfere with the lights or the potting (head of screw is towards the lights). Once I fastened the housings to my bike, I simply snapped the lights onto them and the cables dangled downward.
Next, I used a few small nylon cable ties (zip ties) to tidy up the cables. The ElectroPods came with two small black zip ties for this purpose, but I used a few more that I had on hand to tie up the excess cable length. The cable on these has a fuse and the cable is actually quite long. I chose to bundle up the excess cable rather than cut it shorter. I tied the bundle up out of sight, protected between the rear fender and the black steel tail light bracket that is fastened to the California Vintage fender. I then used a crimped on splice connector to connect the red LED wire to the brake light wire (a blue/red wire on California Vintage). I  then screwed the black wire from the LEDs to ground using a ring terminal that I crimped on.
Once I had the wires connected, it was time to test the new LEDs. I turn the key on and applied the brakes. The LEDs began flashing red and continued to flash until I released the brakes as they were supposed to. I also made sure that my brake light worked as it normally does.
Again, these flashing brake light pods are just an additional lighting accessory. They flash bright red when my brakes are on to enhance my visibility without altering the actual brake light. Due to their small size, I don’t expect these to perform like firetruck light, but I feel they are a significant improvement for very little time and cost.


Sounds like a smart move.
Had a similar situation a few years ago, when my riding buddy said he had trouble seeing the light on my Cal/Titanium. Mounted extra lights off the license plate bracket and it made a big difference.