Moto Guzzi California Motorcycles
Moto Guzzi California Motorcycle Owners News, Reviews and More
Moto Guzzi California Rear Wheel Removal
 Because of a flat rear tire on my 2007 Moto Guzzi California Vintage, I decided to remove the rear wheel by myself. I had never tried to do this before, but found it relatively easy to do. Luckily, I discovered the flat tire while at home. I would not want to do this on the side of the road, and I admire anyone that has done so.
I realize for some riders, removing the rear wheel is no big deal. This was new territory for me because of the shaft drive. I had only worked on chain drive motorcycles a long time ago.
My California Vintage is mechanically the same as a broad range of Moto Guzzi California models and years, and is also pretty similar to Moto Guzzi V7 series. What you see here is the “older” style Guzzi double-sided swing-arm shaft drive. The California and the V7 don’t have the modern type CARC single-sided swingarm that is on the Breva, Bellagio, Griso, Norge and Stelvio. The upcoming California 1400 appears to have a new variation of the double-sided swingarm, in keeping with the classic dual shock absorber styling.
 Before reading this article, understand that I am not a trained motorcycle technician. I’m just an enthusiast that likes to do my own maintenance when I can. This site and this article is not a substitute for a proper manual or professional training. Moto Guzzi’s Use + Maintenance Book provides this Caution: “Disassembling and reassembling the rear wheel may prove difficult; these operations are best left to experienced mechanics.”
The trick to remove the rear wheel on a Moto Guzzi California, or on most any motorcycle that has a standard two-sided swing-arm, is to lift the bike high enough to get the rear wheel out from under it. After considering different ways that I could lift it, I decided to just go buy an inexpensive motorcycle lift. I realized how easily the bike could fall over if I tried to use wood blocks under the center stand, or some other other improvised method to get the rear wheel high enough off the ground. I didn’t want to fool around and risk getting hurt or damaging my bike.
 On the morning of my project, I went and bought myself a $99 motorcycle lift at the Harbor Freight store near me in Charlotte. If you don’t have a Harbor Freight store nearby, they also sell the same lift at Harbor Freight online. Sears carries a very similar one for almost the same price (probably is made in the same factory in China). I considered better motorcycle lifts, but this one will be just fine for me and was within my budget. If you want to learn more about this Harbor Freight lift, you can read my review of it on my Motorcycle Information web site.
After an easy assembly, I practiced raising and lowering the new lift several times before I used it on the bike. That helped build my confidence level, especially regarding what to expect when lowering it. This lift has a foot pedal for lowering, but I found it to be counter-intuitive to operate. On this one, you push it down fast to lower slowly, and push it slowly to lower it fast. It is odd, but it works. Once I got the hang of that, I was ready to begin.
As you may have read, it was not that long ago that I bought new Bridgestone BT-45 tires for my California Vintage. They are still working out great by the way. That day after riding home from the dealer on my new tires, I had discovered that my rear tire went flat overnight. The tube had been pinched during installation at the dealer according to them, and so they took care of it for me at no charge. That included them picking up the bike and bringing it back to me.
I remain a fan of Motorcycles of Charlotte and was very pleased that they immediately took care of it the way that they did. I had them repair this latest flat too. They installed a new Bridgestone tube and re-balanced the wheel for me within an hour on a super busy Saturday afternoon. Once again, I’m a happy customer.
I don’t have a trailer, nor do I have a vehicle with a trailer hitch. I’m sure that I could have had the dealer come get it at my expense though. I don’t have much to spend on my motorcycle hobby, so now was the opportunity for me to try to remove the rear wheel from my Moto Guzzi California Vintage myself.
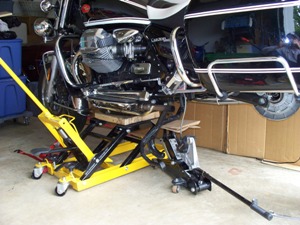
 It took me just a few minutes to assemble the motorcycle lift. Assembly was very easy. Obviously, I’d prefer a nicer professional lift with a ramp and all that, but I have no budget for those luxuries. This one will do just fine.
My strategy was to lift the bike from underneath the engine, from the cast aluminum oil pan. I’d rather lift from something stronger, but that’s all that is there. The pan is pretty rugged, but could become damaged if not careful. I placed two pieces of southern pine 2×6 boards flat across the lift’s arms to spread the load over the entire pan to reduce the chance of damaging it. The rubber padded arms on the bare lift are too far apart to use on a Moto Guzzi California. Adding the two pine 2×6’s worked perfectly.
As I began to lift the bike from the oil pan, I saw it starting to lean back slightly towards the rear wheel. I could tip it back forward easily by hand. Because the location of the oil pan is slightly forward, I realized then I had to counterbalance the bike. To do that, I simply placed a small floor jack under the cross-bar of the center stand (stand has to be up) to help support the rear slightly. The key to this was to keep the bike flat on the pan as it sat on the boards. This was way easier to do than it probably sounds from my description here.
 Once the Moto Guzzi was raised about 8 or 10 inches, I removed the left muffler. I could have also done this before lifting it. I used a 1/2 inch wrench to remove the locknut located on the bracket that is at the bottom end of the crash bar in front of the left pannier. I loosened the muffler clamp and rotated the muffler clockwise from the rear to get the bracket off the stud. I then pulled the muffler to the rear and easily slid it off the H-pipe. So far, this job is going very easy.
With the left muffler now out of the way, I had clear and open access to the head of the rear axle bolt. Now I had room to be pull the real axle straight out. To do that, I used the 27 mm wrench from my original Moto Guzzi tool kit that came with the bike. I loosened the lock nut on the right end of the axle. The Moto Guzzi wrench is very short, so I just used my foot on it to break the nut loose, then I could turn it by hand the rest of the way. Again, this was way easier to do than it probably sounds here.
Once the axle nut was removed, I loosened the pinch bolt on the left swing arm end at the axle head. It just clamps the axle head so that the axle can’t rotate. With the pinch bolt loosened, and with the axle nut rotated out to that hast few threads, I pushed against the nut, and the axle started to slide out freely. I then removed the nut and pulled the axle farther out while supporting the rear wheel to prevent the wheel from dropping.
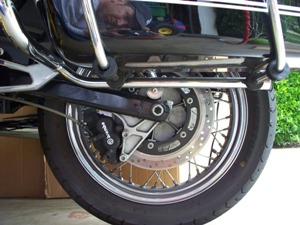
With the axle pulled farther out, the rear brake assembly was still supporting the rear wheel by the disk. By lifting the rear wheel slightly and turning it slightly to the right, the rear brake caliper assembly could slide off a little post on the swingarm that supports the forward end of it.
Now the rear brake caliper assembly could be moved out of the way. I rested it on the small floor jack that was using to support the center stand cross bar. I did not let the brake caliper dangle from the hose as that could damage the hose fittings.
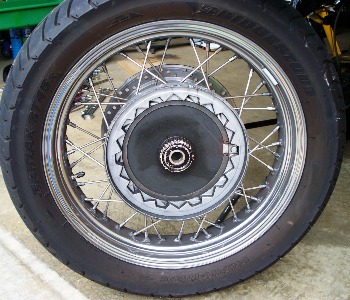 The rear axle and spacer were removed and the brake caliper is now moved out of the way. The rear wheel was now free to come out from under the bike.
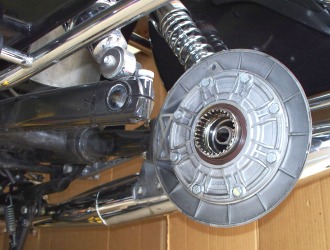
What I saw was the female spline coupling at the rear drive and the male splines on the wheel. I cleaned both using a toothbrush using WD-40 and paper towels to remove the old grease from the splines. I then visually inspected the condition of the splines, which had no obvious signs of wear.
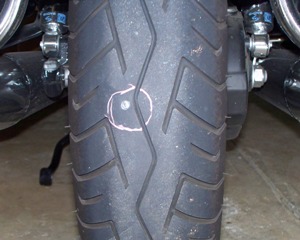
A few hours and about $80 later, I was back from the dealer with a new Bridgestone tube installed and my wheel rebalanced. I then greased the rear drive splines with a moly EP grease. I applied some also to the male splines on the rear wheel. I positioned the wheel under the bike and positioned the rear brake caliper assembly on the disk, and maneuvered the wheel so that I could get the brake caliper bracket back onto the stud on the swingarm. I then slid the axle back in partially and placed the spacer between the brake caliper bracket and the wheel bearing (large end of bushing towards brake caliper bracket). I had to make sure the rear brake hose was held in the proper position by the little clip on the underside of the swingarm. I then pushed the axle all the way in and tightened the pinch bolt. I fastened the lock nut using the 27 mm wrench and tightened it to align the paint marks. I spun the rear wheel to make sure all was free, and then I applied the rear brakes to check.
Next, I slid the left muffler onto the H-pipe and rotated it to get the bracket back onto the threaded stud at the crash bar. I fastened the lock nut there and then tightened the muffler clamp. The bike was now all back together. Now, it was time to lower the the lift and take her for a spin. Another satisfying task done on my Guzzi.


Hi, Would it be possible to replace the rims with tubeless ones.
I know they are wider and wondered if they would rub.
2008 CalVin.
Thanks
Glen.
Bob, I hope you were able to remove the wheel. I imagine maybe if there was no grease left on the splines and if splines had some wear, maybe the wheel would be sticky to try to slide off?
John
Hi, John, removed everything from my rear wheel,which would normally come free of the drive spline’s but try as may it will not move, can you help!
Thanks John for a great writeup! I’ve been doing my own maintenance on Guzzi’s and BMW’s for years and now my 4th and best Cali. I don’t remember that the spacer was fused to the rear brake bracket on any other of my guzzi’s and I’ve changed tires on them all, so I need to get back into my 95 cali’s rear again. I also purchased the BT-45’s this time..but have been a metzeler fan from my beemer days so this will be my first ‘test’ of the bridgestones. I had to reassemble and try another day as I thought I had new tubes in these sizes but did not..so I’ll re-attack this weekend. I don’t know your mileage but wondered why you didn’t consider lubing the rear drive splines where they attach to the rear drive while you were in there..as most guzzisti have want to do? Reading from the guzzi bible by Dave Richardson, I wonder if it’s really necessary every tire change but I do it anyway, and have with all my past beemers and guzzis..haven’t found a dry one yet, all lookin’ good.
Thanks again for the good read and keep the shiny side up!
Jim
Nice job, John. I agree that we should hope and pray that we never have to do that on a dark road 100 miles from nowhere. So far in my 40+ years of riding I’ve only had four or five flats while on a trip and,(knock on wood), they were either discovered in the motel parking lot or somewhere near a town with a bike shop. Once I had ridden over a nail somewhere on a 1,000+ mile ride, but I noticed it the next morning in my own driveway. All of my flats have been on the rear. I check my tires every morning when on a trip. I always carry the same gauge so that I know for sure if my pressure is down, and how much. I also always carry a small air chuck in my tool bag because sometimes gas stations or truck stops don’t have one that will fit in the tight spots we have on bikes. I had a H-D Electra Glide for a few years and it had tubeless tires so I carried a plug kit that got me home one day. Of course the Californias with spokes and tubes aren’t that easy. An AMA membership with the road-side assistance program is a worthy investment. (You may remember my story about the melted fuel line in my gas tank caused by the ethanol blend gas which is becoming more widespread) A tow truck came 50 miles and took me to a motel that night at no charge.
Anyway, good job. Taking the wheel off also gives you a chance to clean and inspect everything else involved in that process,ie; brake pads and rotors, frame, swingarm, and the underneath side of fenders, etc…