Moto Guzzi California Motorcycles
Moto Guzzi California Motorcycle Owners News, Reviews and More
Changing Rear Brembo Brake Pads
 As I approached 16,000 miles on my 2007 Moto Guzzi California Vintage, I started to notice squeaking noises coming from the rear Brembo disc brake as I stopped. Because the brake pads have never been changed, I decided now was the time for me to figure out how to replace the rear pads.
Moto Guzzi has a long history of using Brembo brakes, beginning in 1972. Actually Moto Guzzi motorcycles started coming with Brembo brakes 3 years prior to Ferrari started installing them too.
Speaking of cars, I’ve always done my own brake maintenance on cars, so changing the rear pads on my Moto Guzzi was no problem. However, it was my first time doing so. Here I explain some of how I did it. I am not a trained motorcycle technician. If you decide to work on your own brakes, you must follow the manufacturer’s instructions. Take your bike to a Moto Guzzi dealer if you have any doubt.
By the way, the Brembo instruction document that came with the new pads is written in eight languages. The printing is so insanely small that I needed a magnifying glass just to try to read it. As the baby-boomer population ages, why is the printing on almost every product these days becoming so ridiculously small? Well, my eyes are not getting any younger, but there are standards for font sizes on safety-related instructions which I doubt these meet. Anyway, using my magnifying glass, I read “If installed by a dealer, this document should be given to the end-user.” Unless the dealer is also a watchmaker and uses a jeweler’s loop, I doubt they will ever see that. End of rant.
 The tools I used were: 8mm hex wrench, needle nose pliers, a small pin driver, a small hammer, and a c-clamp. The rear brake caliper is located on the lower left swing arm. I set my California Vintage on the center stand and had easy access to the brake caliper. I was happy that there was no need to remove the rear wheel or the exhaust pipe.
To remove the rear caliper from the swing arm, I tried using the 8mm hex wrench that came with the bike new in the tool bag. Unfortunately, that one was a little too short to allow enough leverage for me to break the two caliper screws loose. They had never been removed before and still had the factory paint marks indicating they were torqued. I then tried one of my own Allen wrenches which was a little longer and more rigid. It worked much better and each screw loosened with moderate effort.
Being very careful not to bend or damage the hydraulic brake hose, I gently repositioned the caliper off the swing arm and placed it on a small box that I placed beneath it so it would not stress the hose. The caliper is actually very light weight, unlike the caliper on a car, so I found it way easier to manage this little Brembo caliper than the big heavy steel calipers on my car. No need for hanging it from a wire coat hanger.
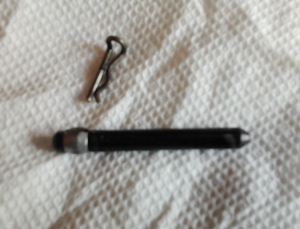 The metal backing on each rear brake pad has a hole at one end of it. The caliper shaft passes through that hole to retain the pads while allowing them to move along the shaft to contact the disc. To remove the pads, this small shaft has to come out of the caliper.
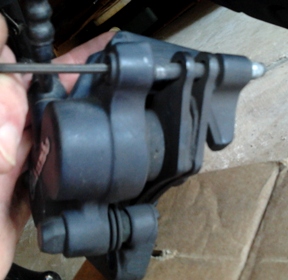
I noted the position of the cotter pin on the caliper shaft. Using pliers, I then removed the cotter pin. The shaft could now be driven out. Using a small hammer and a pin driver, or perhaps a small hex wrench in a pinch, I drove out the shaft from the caliper (small end of shaft) with relatively light taps from the hammer.
The caliper itself has a large hole at one end of the shaft (next to where where the cotter pin was), and a small hole at the other end. Without too much force, I drove out the shaft using a small hammer to drive it out the large hole. As the shaft started to come out, I could see that there is a simple friction ring on the shaft that fits into the hole on the caliper. The ring stays on the shaft and provides the light press fit.
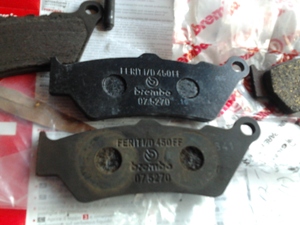
I removed the old pads and wiped the caliper surfaces clean. I used the old pads and a c-clamp to very gently squeeze the piston back into the caliper to make room for the new pad thickness. The difference in thickness of the worn pads and the new pads was very obvious. Fortunately, the old pads still had some thickness to them and they were not worn down to the metal backing. I installed the new pads, drove the pin back in, and installed the clip on the pin. I then reinstalled the caliper onto the swing arm and fastened the two caliper mounting screws. The job was easier than I expected.
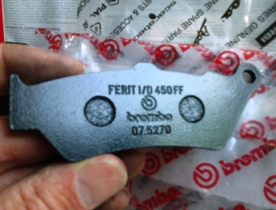
First, I looked up the Moto Guzzi part number for the rear pads for my ’07 Vintage. The part number is AP8113627. I then searched online and found a few places offering them for just a little over $12 USD. It turned out that the part number is also used by Aprilia, and and has the AP prefix instead of the typical GU prefix for Guzzi. I learned the Aprilia Pegaso 650 uses these pads in addition to the Moto Guzzi Bellagio 940, and of course the California Aquila Nera (the predecessor to the new California 1400 Custom). The Brembo factory instructions that came with the AP8113627 pads has Brembo part number 98.5031.70.
 So, I visited my new local Moto Guzzi dealer to see if they had these and to check out the dealership. They became a Guzzi dealer last year and had already been an Aprilia dealer for quite a while. By far, this dealer is actually best known for Kawasaki, Yamaha, Polaris ATV’s, Can-Am three wheelers and Sea-Doo watercraft. I was not surprised at all that they did not have the brake pads in stock.
I was surprised to see they had 3 V7’s, 2 Stelvios and a Norge in their showroom though. I was about a week too early for the new California 1400 to arrive, but as of this writing, they have 2 California 1400 Customs in the showroom. I’m still looking forward to test ride the Touring.
Of course, there are other brands of brake pads available for the Moto Guzzi California and California Vintage. EBC is one of the more popular aftermarket brake brands. The EBC Extreme Pro brake pads are highly rated and I am considering installing these when it is time to replace my front pads.
Categorized Under
About John Clay
Suggested Articles
-
Four way flashers installed on Moto Guzzi
Four way flashers, also called hazard lights, are not standard on all motorcycles. Many motorcycles do not come equipped with them. My 2007 Moto Guzzi California Vintage did not have four way flashers until now.
-
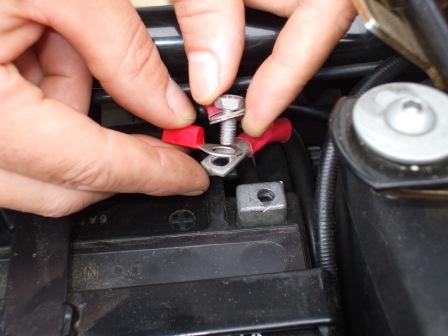
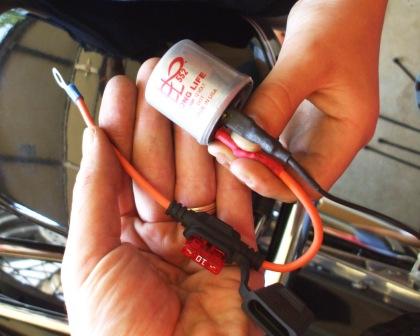
Battery Tender Junior installed on Guzzi
To put an end to any lingering battery worries, I bought a Deltran Battery Tender Junior. I love this gadget and wanted to share a few installation tips and photos of how I installed it on my Moto Guzzi California motorcycle.
-
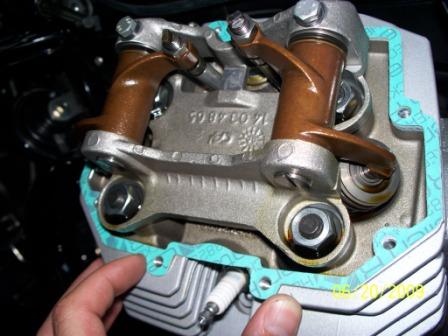
Moto Guzzi California Valve Cover Gaskets
Replacing a valve cover gasket on a Moto Guzzi California very easy to do, like on an older car. The California Vintage has 1064cc push rod engine with 2 valves per cylinder. This engine pretty much the same as the Moto Guzzi California V11 engine. It is simple and beautiful.

No Comments