Moto Guzzi California Motorcycles
Moto Guzzi California Motorcycle Owners News, Reviews and More
Moto Guzzi California suspension adjusting
 One of the easiest ways to improve the handling and riding comfort of your Moto Guzzi California is to adjust the front and rear suspension to match your needs. At the request of a reader, I demonstrate in this article some of the basic suspension adjustments that Cali owners should be aware of.
Depending on which specific Moto Guzzi you have, your front suspension may be adjustable via a small dial on the top of each fork tube. This is a very nice feature for any motorcycle to have, since the dials are within arms reach while riding, and no tools are needed.
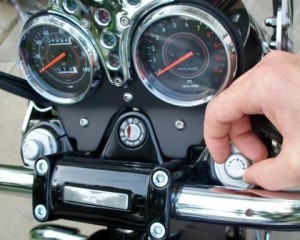 On the California Vintage, the dial on top of the left fork tube adjusts the compression rate. The dial on top the right fork tube adjusts the rebound rate. To reduce the amount of each, rotate the dial a click or two in the “-” direction. The California EV and California Classic front suspension is adjustable in the same way.
So, what is compression and rebound anyway? Well, think of compression as how quickly and easily the motorcycle dives down forward during a sudden stop. If you want to reduce that dive, then you will need to increase your front compression.
For rebound, think of how fast the front of the motorcycle springs back up after it stopped diving forward during that sudden stop. To slow down the return bounce, adjust the rebound.
I’m sure some motorcycle suspension experts may wish to argue or perhaps improve upon this explanation. Reader comments and clarifications are always welcome here, just use the comment form below.
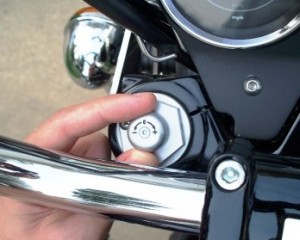 Personally, I prefer a good amount of compression in the front suspension. I find that I can “feel” the road better and that makes me a more confident rider because I have a better feel for how my motorcycle reacts to road surface variations.
When the front suspension is too soft, I don’t have as much feel or feedback from the road through the handlebar grips. I like some level of feedback about what my front tire is experiencing, but not so much that it makes very too rigid or too harsh of a ride.
For rebound, I honestly don’t adjust that dial very often. Maybe I just happened to have it right where I like it, or maybe I just didn’t feel much of a difference when I played around adjusting it in the past as I was being curious. So, no opinion here either way. Just try adjusting it and see what result you get.
Take it easy when riding after you do adjust suspension as your motorcycle will handle a little differently, maybe worse than expected if you go too far or the wrong way with your adjustments.
In 1928, Moto Guzzi introduced rear suspension on the Norge. Yes, a Norge in 1928. This was quite an innovation at the time.
Moto Guzzi California motorcycles have a swingarm rear suspension with dual shock absorbers mounted in a traditional outboard style. Again, depending on what your Guzzi came with, you may be able to adjust the same as what I show here on my California Vintage. The shock absorbers on the Vintage are from Sachs. They do a decent job and I think they look pretty good too.
There are several high performance (very expensive) aftermarket shock absorbers out there on the market if you are a very advanced rider and need such precision tune-ability, but the stock Sachs units work quite well for me.
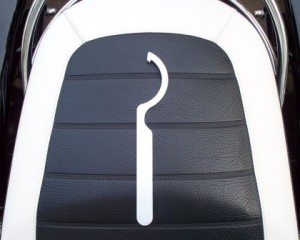
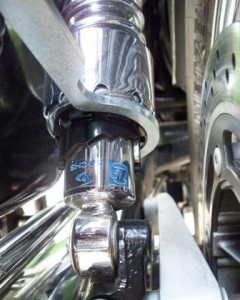 The spring pre-load is adjusted by rotating a black toothed-collar located directly below the chrome lower coil spring cup. Using the special question mark shaped tool that came in the bike’s tool kit, simply line up the tooth on the tool to a notch on the black collar.
The C-shaped part of the tool needs to be on the side that you are trying to rotate towards.
Because the Vintage is a “bagger” and comes with hard bags (panniers) that are not detachable, it is a little more difficult to make adjustments to the rear shocks due to the limited working space between the frame and the side bag.
This allows you to ratchet the compressed height of the coil spring on the shock absorber, and by doing so, you are altering the spring rate and the stiffness of the rear suspension. Make sure that both rear shock absorbers are adjusted to the same spring compression notch.
If you often ride with a passenger, or if you happen to be a heavier person, you’ll probably want to increase the spring pre-load. This will reduce the sag of the rear suspension and will provide a smoother ride with less risk of bottoming out.
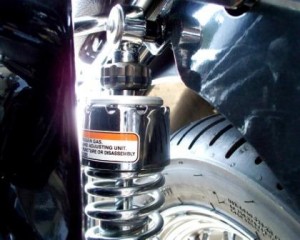 The California Vintage rear shocks are also adjustable for rebound damping. No tool is required for this. There is a fluted black adjustment knob located near the top of the shock absorber.
To adjust, rotate the knob to add to or to take away from the “bounciness” of the ride. For example, if you didn’t have enough damping, the rear suspension would bounce up and down like a pogo stick (well, not exactly, but you get the idea). Too much damping would make the rear suspension too stiff or harsh (too slow and too resistant to be able to absorb small bumps), in addition to the stiffness of the spring pre-load.
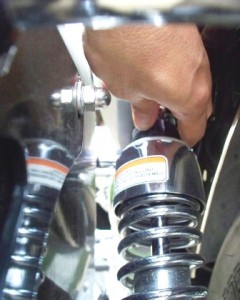 Other Guzzi California models also have adjustable rebound damping on the rear shock absorbers, but the adjustment knob may look a little different and may be located near the bottom of the shock instead of the top. Some Californias do not have this feature.
Not that it matters much since everyone is different, but my personal preference for the rear shock absorber pre-load on my Cal Vintage is the lightest setting. I weigh about 168 pounds (76 kg) and I normally ride alone. When I do have a passenger, it is my 9 year old son. Our combined weight is only about 230 pounds (104 kg). The longest spring height (least amount of pre-load) is a good setting for this weight range in my opinion.
Keep in mind this is on a like-new Cal Vintage with only 5000 miles (8000 km) on it as I write this. An older bike that has seen more riding, or a California with different make or model of shock absorber may require different settings to adjust suspension for this same weight range.
Some Moto Guzzi California motorcycles, such as the Stone, had rear shocks that were adjustable only for pre-load (ride stiffness). To adjust those, there were two special thin nuts located at the top of the coil spring. First, remove the seat. Then use the special tool like the one pictured above to loosen the top nut several turns. Next, loosen the nut closest to the spring to reduce the pre-load to soften the ride, or tighten that nut to increase the stiffness of the ride.
Make sure to adjust both rear shocks equally and don’t forget to tighten the top nut to lock your adjustment in place.
Moto Guzzi California suspension adjustment is pretty easy to do, as I hope you were able to see from this article. Adjusting suspension on your motorcycle is pretty much performed via trial and error. Remember to adjust a little at a time, ride safely, and give yourself enough time to experiment with different settings to see which ones work best for you.
If you’ve modified your California suspension with some aftermarket shock absorbers or by making other interesting suspension modifications, please tell us what you did and how well it worked by adding a comment below.


I have a 2000 California Special and have set the suspension on the hardest, front and rear, because the bike seemed to weave. Since then I have slackened the steering damper off to the lowest friction level (all the way anti-clockwise) and that seems to have cured it.
What are the settings supposed to be? How many turns away from max should it be for 1) me 190 lbs, the wife 100 lbs, and Guzzi leather panniers with luggage.
2) myself and wife
3) just me
Or is it just trial and error?
I have had to replace my front fork seals a few times already. I also find it difficult to settle on an adjustment level as the front end seams to have some demons. Any issues that people are aware of with the 2007 front end would be appreciated.
The saddle bags on the California Vintage are easily removable, by loosening the three acorn nuts on each side and then lifting the bags off. Doing this does not take that much longer than removing some of the so-called removable bags, which lock on with a key.
Removing the bags makes adjusting the rear shocks so much easier.
I realize you know this, but someone new to a CALVIN might not.
Mike
[…] This post was mentioned on Twitter by Gerry Schroeder, Gerry Schroeder. Gerry Schroeder said: How to adjust suspension on Moto Guzzi California motorcycles … http://bit.ly/cyEGUr […]